Menu Close Menu

0 comments
feedback Floating feedback buttons have become fairly common place, and I have yet to see someone that doesn't understand how to use them. So the advantage of using a floating feedback button is that you will get a lot more feedback. This is not necessarily desirable, as it will likely increase your support costs, but for most companies it's a good idea. You also have to make sure that it fits into the overall design of your website or blog, and that it doesn't distract from your content. I always prefer presenting users with just-in-time feedback moments if possible. For example: after completing a check-out process present the user with a follow-up survey. Considering the fact your user has just committed to your organization/website chances are pretty good that they are willing to spend some time on your feedback. So Today i will going to sharing with you a Great feedback buttons and how to add Floating Feedback to your blogger blog or website. The set below consists of 36 PNG buttons along with the CDR file if in case you wanted a color of your choice.

How to add feedback Button to blogger blog.

The steps are very simple. Download the icons and upload your favorite feedback button in Blogger. Once done, you may then follow few steps below,
1. Go To Blogger Dashboard >> Layout >> Choose a HTML/JavaScript Widget
Paste the following code inside it,
<a style="display:scroll;position:fixed;bottom:50%;left:0px;" href="URL OF CONTACT PAGE" title="Feedback Please, Can't go further without your help"><img src="FEEDBACK BUTTON IMAGE LINK" /></a>
Make these changes:
  • By default the button will appear at center left but if you want to shift it to right then change left to right.
  • Replace URL OF Contact page with the address link of your contact me page.
  • Replace Feedback Please, Can't go further without your help with any message you may like the visitors to see when they hover their cursor on the button
  • Replace FEEDBACK BUTTON IMAGE LINK with the image link of your uploaded button.

2. Save your template and see it on your blog.


Feedback All Resources are always shared with subscribers, if you are already a subscriber then kindly post your EMAIL ID in comments or if you are a new visitor then kindly submit your EMAIL ID below in sign up form , Activate your feeds and then post the same email id below in comment box so that we could email you the download copy within 24 hours. By subscribing once you can download any icons or buttons published by us so far.
Thanks for reading our post. Keep updated by subscribing our blog feed or by  like our facebook page.

Read Article →

2 comments

download In these days Playing Flash Games online is very important for time pass on your computer. People Love Playing These Small games online just to take their minds turn for Entertainment. A Lot of fun enjoyed by playing Flash racing games that too Flash car games online are rather more popular among the youngsters especially boys. The reason behind this is the youngsters are more passionate regarding the speed. Play Flash car games is the most enjoyable regardless of the age. The match with several tracks with increased difficulties is the choice of youngsters. Rally type of contests is also popular due to various rides through roads. Dirt biking is one more type of racing car games which is found to be popular among people. There are also a lot of dedicated flash gaming websites out there, and the seem to be making quite some money out there ( this not bad idea for a new blog niche) For the Flash gaming  blog or website owner like to put flash game to their site, Google is announce few guide lines for monetizing from your website.


Distance between Ads and Flash Games

animated ads sections is confuse people if ads are placed near to flash game. Some Games require Frantic clicking, which leads user to click outside the flash content. which means user accidental clicks on ads instead of the flash content are inevitable.

All of this leads to invalid click activity, If Google see invalid activity on your site your Google account is getting banned. to avoid getting banned from Adsense, it is very important that you keep a distance of at least 150 pixels between flash content and ads. Google also make a screenshot for placing ads for flash gaming site. see screenshot below. Placing ads left method is wrong and right method is right.

flash games


Policy Adsense For Games

You can monetize Flash games, however Google policies do not permit monetizing games with sexual or violent content. Google doesn't allow you to add sexually explicit or profane content on your flash content. It's family safety rules are pretty strict about such things.

AdSense for games (AFG) is a product designed specifically for the monetization of Flash games. Using AdSense for content (AFC) ads as a pre-roll before, or mid-roll during a Flash game, is against Google policies, as the product was not created for this kind of an implementation. If you wish to use Google ads as a pre-roll to your game, please apply for AFG. For more information about AFG, please visit Google  Help Center. Source Adsense Blog

If you still have question plz feel free to post your comments below in comments section. I will love to reply or helping our readers. Keep updates by subscribing our blog email feed by submiting form below. Thanks for reading our post. Happy Blogging....!!!!

Read Article →

10 comments
Blogger Tricks HTML Parser or EnCoder Tool was created so Google Adsense can be added into the body of Blogger Templates. However, if anything you add Blogger Template gives an error, more likely than not putting it through the EnCoder would solve the problem.
While writing tutorials or asking a question, sometimes it becomes very necessary to post html and javascript codes in your blog comment forms powered by Blogger. You have seen many authors posting HTML effectively but when some of you try to do it, you get an error. This is because Blogger Comment form doesn't support direct posting of HTML and JavaScript. In order to help you to do that we will need to change/encode the same code into a text and then post it effectively without any error. Our Tools/App will help you to change HTML characters to simple text, which could be easily inserted in your blogger template and comment form. You can also use it to convert your adsense code into an embeddable form.
We had been lucky to utilize this free service for blogger platform and create some amazing Desktop Tool with the help of our developer Abdul Jabbar. The HTML EnCoder has been Created by Abdul Jabbar. We say thanks to Abdul Jabbar For Precious Service and Efforts.


Update:- October 22,  1. Improve Design and layout 2. Help menu added 3. also remove spaces bug.

Copyrights

Developers and niche bloggers are most welcome to share this  Tool/App with their readers and friends. Please attribute the credits back to Blogger Tricks blog as the only favor in return. It takes 6 Days of efforts to Making this tools. This Tool/App comes under a Creative Commons Licence This work is licensed under a Creative Commons Attribution-NonCommercial-NoDerivs 3.0 Unported License.


Tool/Apps Preview

We just hope this Application adds new fuel to your blogger powered blogs. We tried best to keep it working as efficient as possible. Let me know if you needed any help. We have some more interesting Apps coming Soon. Stay tuned! Subscribe our blog for stay updated.. Thanks for Reading our post...
Read Article →

1 comments
Today in this post i am  going to show you  a great Google Cheat Sheet Ebook to optimize your site. As your Internet use has evolved, Google has evolved with you. And for you. Its ability to make the right decisions about your online business online. Google is always there to help you. whether you are beginner looking to make a mark on the internet or just wanting to learn some stuff, or a pro who wants serious business online. On the Google Webmaster Central Blog, you will find any number of news, tutorials, tips, and best practices involved with webmastering. if you're more of an advanced user, we something for you too! You can check out the more extensive Google SEO Starter Guide that will detail you through most of the basic SEO aspects. Everyone knows someone who just set up their first blog on Blogger, installed WordPress for the first time or maybe who had a web site for some time but never gave search much thought. Google came up with a first steps cheat sheet for just these folks. It’s a short how-to list with basic tips on search engine-friendly design, that can help Google and others better understand the content and increase your site’s visibility. We hope this content will help those who are just about to start their webmaster adventure or have so far not paid too much attention to search engine-friendly design. Over time as you gain experience you may want to have a look at our more advanced Google SEO Starter Guide. See ScreenShot Below The First Step Cheat Sheet Ebook.


Download: Google Seo Guide

This eBook is free to use, and you can distribute or print it as you like! Give it a read, and share the knowledge with others too. Thanks for reading our post.
Read Article →

2 comments

In this post i am gonna to show you how to add 768 x 90 leaderboard between header and post area on the home page or post page of your blog. You may have seen many blogs that have installed Adsense or any other widget/gadget below their blog's header.Most of them use the 768x90 unit ad banner in their banner and it is a perfect place to place your ads and earn more money from your blog.But what is you can't see the "Add a Gadget" Link" in your blog's template layout ? Here I have a solution for this problem we will fix this with editing some codes inside your template.


Cross Column Gadget

In the screenshot below no have cross column gadget.


Dont have crross column


In the screenshot below have cross column gadget option.


Have Crross column

How to enable Cross Column Gadget Option

1. Go to your Blogger Dashboard>> Template>> Proceed and press CTRL+F and find the following code. (how to find code using search bar)

showaddelement='no'/>

2. Change Showaddelement='no' to Showaddelement='yes' as shown above :

You can now save your template and Go to layout page where you will be generated with the new 'add a gadget' option.

There may be other areas you can add gadgets to your layout that are blocked.The code i changed is 'showaddelement' which breaks into 'Show Add Element'.Search your template for every occurrence of 'showaddelement' and switch 'no' to 'yes'.

If you face any problem feel free to post your comments below in comments section. I will reply you as soon as time allow. Remember you can get all these tips sent directly to your email and stay a step ahead.Its a quick and easy service Provided for Free by Google. Just fill in the Email form below the post. Thanks for reading our post.

Read Article →

4 comments

adsense In this post i am gonna to show you how to place AdSense ads anywhere in the post description and you can also place ads in every post in different areas. Using this trick you can see very positive effect on your AdSense earning. This is a great tutorial which will multiply your current click through rate and add a new boom to your over all AdSense earning. In our previous post i have tips on how to show AdSense below post title and below post. if you face any problem with this tricks feel free to post your comments below in comment box.


Add it to blogger

1. Go to Blogger Dashboard>> Template>> Proceed and find the following Code by pressing CTRL+F. (how to find code using Search bar)

<data:post.body/>

2. Replace the above  code with the following Code.

<div expr:id='"ads1" + data:post.id'></div> 
<div style="clear:both; margin:10px 0"> 
PUT YOUR PARSED ADSENSE CODE HERE 
</div> 
<div expr:id='"ads2" + data:post.id'> 
<data:post.body/> 
</div> 
<script type="text/javascript">
var obj0=document.getElementById("ads1<data:post.id/>");
var obj1=document.getElementById("ads2<data:post.id/>");
var s=obj1.innerHTML;
var r=s.search(/\x3C!-- adsense --\x3E/igm);
if(r>0) {obj0.innerHTML=s.substr(0,r);obj1.innerHTML=s.substr(r+16);}
</script>

3. Replace the above word (“PUT YOUR PARSED ADSENSE CODE HERE”) with your adsense parsed code.  you can parse your adsense code by using Our HTML ENCODER TOOL.


4. Time to add adsense ads in post. Copy the below code and paste it in your post editor (“HTML View”) where you want to show ads.

<!--adsense-->

and you're done!!!! Click on publish button and view adsense in your post description. 

Note:-if you don not want add code in every post use below Method..

Tip: Add the <!-- adsense --> code to your post template. In blogger Dashboard Click 'settings' –>'Post and comments' –>and find the word “post template” click add>> and paste the code in post template text area and click on save setting button. Done!
(Google help-Whats post template?)

I am always open to curious and delicious questions so never hesitate asking for help. Thanks for reading our post.

Read Article →

0 comments

toolbox-css-csstricks If you are a website or blogger user you now about copy and pasting codes for your website or blog. Regular internet users know about, when he select the code or text for copying the default highlighted text color is white and background is blue. Today in this post we going to learn how to change highlighted text background color. You can do it by adding a small snippet of CSS. you can see screenshot below for live preview or check out by selecting our blog text.

Before:

Before

After Adding CSS

After

Add it to blogger

1. Go to blogger Dashboard >> Template>> Proceed>> and find following code by pressing CTRL+F.

]]></b:skin>

2. and paste following code Before/above ]]></b:skin>.

::selection {
color: white;
background-color: #444;

}

::-moz-selection {
color: white;
background-color: #444;

}

3. Finally click on save your done!!!.

Note:- If you want change the highlighted text background color just change the color “#444”. For generating color codes check out the our color code generator tool.

I know it's a little change in the  look of your blog but when set to with your color compatibility  of your site it is a unique Change. Keep up to date with new features and opportunities by subscribing to this blog via email Notification, adding our Google+ page to your circles or like us our page on facebook. Thanks for reading our posts.

Read Article →

0 comments

2013031201 Pinterest is a social media site that allows users to “pin” images and videos they find online to a virtual pinboard and share them with others. It’s similar to other social bookmarking sites like StumbleUpon, but users can only pin videos and images. There is also a Pinterest app for Android smartphones and for iPhones. Pinterest offers a bookmarking tool called “Bookmarklet” that installs to your Web browser toolbar and enables you to pin any image or video you find when browsing the Internet. You can even add a Pinterest button to your blog to redirect people to your pinboards. Pinterest has finally decided to launch a new Web Analytics program which will help website owners understand what sort of images interest people.


The history of Pintrest

Pinterest was founded by three individuals: Ben Silbermann, Paul Sciarra and Evan Sharp. They launched the website in 2010. Less than a year after launch, the website had more than 10,000 users. By the end of 2011, Pinterest had become one of the 10 largest social networks, attracting 11 million total visits per week. At the start of January 2012 the website had a reported 11.7 million unique users.


Pintrest Lunched New Web Analytics Feature<

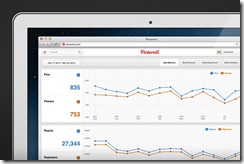
Now on pintrest  you will have access to  analytics data regarding pins from your website.  you will be able to see how many people pinned from your site, how many people saw those pins. how many actually visited your site. Besides this, you will also see your most pinned, most clicked, and most recent pins.

pinterest

For Using Pinterest Web Analytics Feature you need to verify your Website or blog by going to verification help page . Pinterst Website or blog verification is very simple like Webmaster Tools Verification or Yahoo & bing Site verification. Verify your site now if you have any trouble about verify steps Feel Free to post any query below in comment box. after verify process Go your pinterest profile page and switch to new look after doing this you will see data analytics option in the top right corner. you can switch new look by going at this page.

now you can Explore all the pinterest web analytics features for improving your website or blog content if you face any problem feel free contact pinterest Support team or post any query below in comment box. Keep up to date with new features and opportunities by subscribing to this blog via email Notification, adding our Google+ page to your circles or like us our page on facebook. Thanks for reading our posts.

Read Article →

5 comments

gogole_thumb[2] You know when every one start blogging like all new bloggers. He/she want immediately wondered how will he get their blog on Google Search. How you do that?? How can you get your blog and post to displayed in search result  at front page. For doing this! you need to read Hows Google Search engine will work and what steps you need to taken for helps your blog page rank on Google. A decent position in the search results is a sure fire way of making more money online. But to do that, you need to make sure your site gets crawled. Here, I'll take you through the Webmaster Tools Videos of how Google crawls the web and what you can do to help it. You might be surprised how easy it is. So, let’s start at the beginning. Google searches the web. This much you probably know. Then it ranks all the sites and matches them to your query, in order of relevance and authority. SEOs spend a lot of time talking about this part, but much less time talking about how Google actually looks at sites. But it’s important - Google can’t put your site at the top of the search engine results if it doesn’t know you exist.


What actually is ‘Google’?

Whenever you read an article about SEO, the author will almost always talk about "Google" (usually not "Bing" or "the search engines" - Google’s market share is so big, that the smaller ones often don’t get mentioned). But they’re not talking about the company, with offices and marketing departments and all that. They’re talking about the Google algorithm. The Google algorithm, if you saw it, would look very complicated, incomprehensible even. It’s lines and lines, pages and pages, of mathematical sequences. But unless you become a search engineer at Google, you’re not going to. So phew. What I‘m about to tell you, and indeed what anyone will ever tell you about the Google algorithm, is what’s presumed to be true. No one outside Google knows exactly how the Google algorithm works because no one has been able to see it. We, the SEO Blogger, can only monitor and record the search results and draw assumptions based on what we see, but we can never ‘know’.


Below I am Showing Ten Videos which is posted by Google Webmaster Tools. I'm 100% certain anyone that watches these videos will have learned something.


Finding your site on Google

Learn how to find if your site is in Google's search results already, and if it's not, how to get it included.


Create Great Content Tht Performs Well in Google

What does it mean to create great, user focused content? How do you get started, and what are some great questions to ask yourself?


Learn About The Google Webmaster Tools Message Center

The Message Center is one of Google's primary partnerships with webmasters. Learn more about what this feature offers, and why it is important for you and your users.


Understand Which Google Searches Are Driving Traffic To Your Site

The Search Queries page of Webmaster Tools provides great, actionable data about your site. Understand the terminology you might see there, and how to interpret the data.

Crawl Errors Google May Find

Learn more about errors that Google's system can encounter while trying to discover your content, and where to go to troubleshoot these problems.


Using Social Media Can Help Your Site In Search

Learn the real-world implications that social medias can have on your business, and how to engage your audience and future users

Using Sitemaps To Help Google Find Your Content

Sitemaps help Google and other search engines discover your content so we can serve it to users for relevant queries.Read our post on how to submit your sitemap to Google.

How Malicious Partys Can Spam Your Site

Malicious visitors to your site can create spam through mechanisms such as comment spam, forum spam, and freehost accounts. Learn about these tactics and how to prevent them early on.

Webspam Content Violations

Understand more about our Webmaster Guidelines and ensure you are adding value for your users.

SEO for startups in under 10 minutes

Maile Ohye from Google advises your startup as if she had only 10 minutes as your SEO consultant.

Keep up to date with new features and opportunities by subscribing to Webmastertools on  Youtube Channel blog via email Notification, adding our Google+ page to your circles or like us our page on facebook. Thanks for reading our posts.

Read Article →

0 comments

In our Previous post i will tell you how to submit your sitemap to google and submit your content to google. Today we going to share with you a great information about increasing your page rank by adding nofollowing tag. The noFollow tag was created as a way to disclose to search engines that although your mom blogging site is adding a link to a certain destination, it is not endorsing the destination site. Initially used for blog comments to combat comment spam, it protected blogs from inadvertently linking to so-called bad neighborhoods on the Web. Linking to known spam or scam sites is against the guidelines of all the major search engines, and will get your site penalized even if you aren’t spamming or scamming.

A Page Rank by Google is an important rank that determines the importance of your website or blog in the eyes of search engine spiders. A spider is a robot that is responsible for crawling your content and indexing it on data bases. Since the entire infrastructure of GOOGLE PageRank is based on quality back links therefore it very important that you should flow the PR juice wisely and do not waste it on useless links.  By useless links I mean websites that use login structures or IFRAMES. An I framed webpage is not crawled by spiders because it can not access it. All social media networks have a login algorithm that allows visitors only with a unique password. When you link Facebook Profiles, Twitter or Blogger Profiles or any other social network, make sure you add the no follow tag to them.

If you write a sponsored post, Google considers that a paid link. Any time you take money from someone and link to that company’s website, you run the risk of being dropped from the Google search engine results pages. If you write tutorials like Our blog and share a Preview link or Download Link then make sure you tag them as nofollow because linking files and hosting websites will Decrease all your Page Rank. So don't forget to add nofollow tag to your backlinks, Profiles links or any other backlinks,


How to nofollow tag to your links

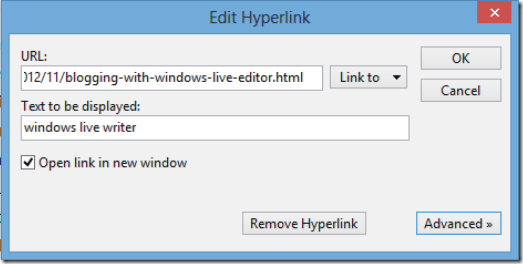
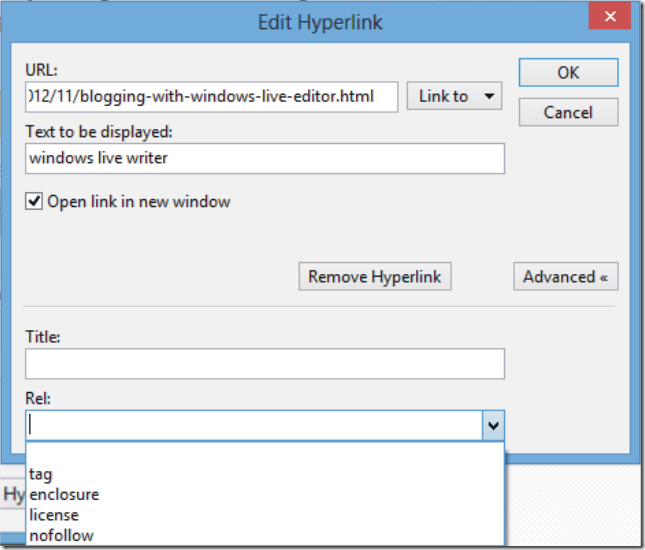
If you are using windows live writer your don’t need to add manually no follow tag. see screenshot below how to add no follow in windows live writer.

Advance

1. Click on insert hyperlink and then click on advanced>> and then Rel Tab menu. like screenshot below.

Rel Link 2. When you’re done your link will be looking like following code.


Your simple link look like this.

<a href="http://bl0gger-tricks.blogspot.com/2012/11/blogging-with-windows-live-editor.html" target="_blank">windows live writer</a>


To make any link nofollow just change the link Look like below link,


<a href="http://bl0gger-tricks.blogspot.com/2012/11/blogging-with-windows-live-editor.html" rel="nofollow" target="_blank">windows live writer</a>


To add a noindex tag which is not very necessary do this,


<a href="http://bl0gger-tricks.blogspot.com/2012/11/blogging-with-windows-live-editor.html"  rel="noindex" rel="nofollow" target="_blank">windows live writer</a>

you can see above highlighted nofollow tag. if you are blogger post editor then you need to manually add no follow going to HTML VIEW in blogger post editor. Adding NoFollow tags is easy and completely worth the time, effort and best way to safe and make your pagrank healty. Keep an eye out for future posts on this blog.be sure to subscribe to this blog's feed (or enter your email address in the right hand sidebar to subscribe by email) and you'll receive the latest posts when they're published. Thanks for Reading our post.!

Read Article →

0 comments

gogole Increase your visibility by submitting and optimizing your website for Google search, and distributing your content across the web. The Submit Your Content page started as a bit of a twist on Google mission. The Goal of Google for “To submit your content” is to organize their own information so that Google can be more accessible and useful for you, whether you are a current or prospective Google content partner. As the variety of content and the number of Google tools have grown, Google wanted to make it easier for you to take advantage of the many content distribution opportunities across all of Google's services.


David Eun posted on the Official Google Blog about the three principles that define how we work with content partners at Google. And he highlighted what was a challenge at the time: "Only a fraction of the world's information is available online." As you have put more of your organization's information online, Google have introduced more services for organizing and distributing that information.


Google Central Blog Said.

As you have put more of your organization's information online, we've introduced more services for organizing and distributing that information. We've heard from a number of you that it's not always clear how to help us find your content – or obvious how users discover your content at Google.


If you want to submit your content to Google. Go to Submit your content to Google 

  • Click on site owner.
  • and then click on “Add your URL”
  • and submit your URLS one by one.

and you're done!

Google don't add all submitted URLs to their index, and Google can't make predictions or guarantees about when or if submitted URLs will appear in their index.

Keep an eye out for future posts on this blog.be sure to subscribe to this blog's feed (or enter your email address in the right hand sidebar to subscribe by email) and you'll receive the latest posts when they're published. Thanks for Reading our post.!

Read Article →

8 comments
Submit Sitemap To Google In earlier posts i posted tips on How to Submit Your Website Sitemap To Google Webmaster tools. Today in this post i am going to show you how submit blogger sitemap to Webmaster tools. Sitemaps basically show Google search bots you recent activity quicker and without the bells and whistles than can cause crawl errors. Submitting sitemap to Google is the best way to increase your traffic. Submitting a sitemap means to send request to search engine for the indexation of your blog's all posts and pages in search engine. If you have a blog which contains 30/40 posts, pages then you must submit sitemap to search engines in order to increase the traffic of your blog. The first sitemap only contains your 26 most recent posts ! If you have more than 26 posts they are not indexed.You should still add both sitemaps, the more the better. There are two main steps to submit sitemap. First is verifying your blog on Google Webmasters Tools and second is submitting the sitemap. So friends what are you waiting for, let's start it.

Step 1. Verify Your Blog in webmaster tool

Go To Webmasters Tool and sign in with your Google account. After signing in, you will be on homepage and there you will see all the blogs of you. If you are using blogger then all the blogs will be automatically added to Google webmasters tools because blogger belongs to Google. So, to verify your blog click on 'Manage Site' drop down menu in the right side of your webmaster dashboard and go to “Verify This Site”. like screenshot below.
Verify This Site 2. Next click on alternative method like screenshot below.
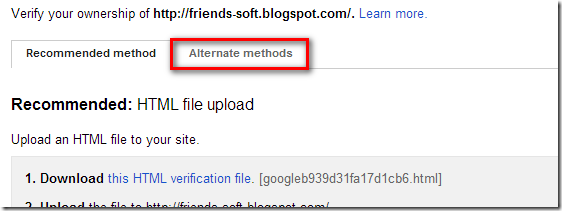
Alternative Method
3. Click on HTML TAG circle like screen shoot below you will see HTML META TAG For verification your website or blog.
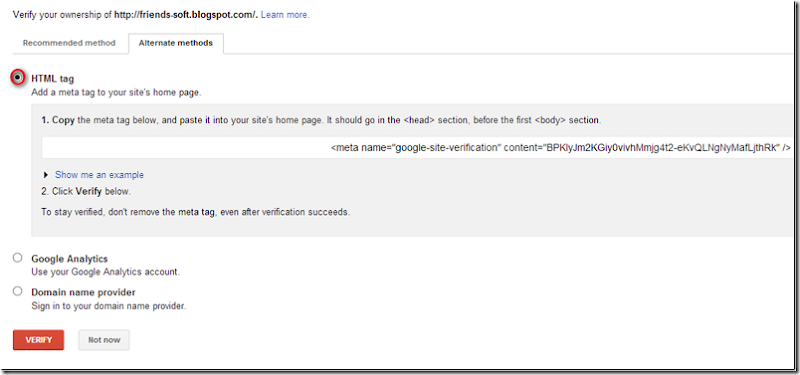
ChecktheHTMLTagCircle_thumb2
4. Copy the meta tag (for example, <meta name="google-site-verification" content="z5mJLjVGtEe5qzCefW1pamxI7H46u19n4XnxEzgl1AU" />) from the Instructions box.
5. In a new browser window or tab, navigate to the Google Site you wish to verify. (You will need to go back to the Webmaster Tools page, so do not close it.)
6. Paste Meta Tag after opening “<head>” Section.
2009-12-09_0852
7. Click "Save changes."
8. Go back to the Webmaster Tools page where you copied the meta tag.
9. Click "Verify." and you're done!!!!

Step 2. Submit your sitemap to Google Webmaster tools

Sitemap 1

Go to your blog and look at your blogs address in the browser at the top of the page it will be :
http://www.YOURBLOGNAME.blogspot.com/
or if you have a custom domain :
http://www.YOURBLOGNAME.com/
in our case http://bl0gger-tricks.blogspot.com
Step 2.
Add the following to the end of your blogs URL :
robots.txt
So now you have :
http://www.YOURBLOGNAME.blogspot.com/robots.txt
http://www.YOURBLOGNAME.com/robots.txt
in our case
http://www.bl0gger-tricks.blogspot.com
and go to the address
Step 3.
The Page text look like this.

User-agent: Mediapartners-Google
Disallow:

User-agent: *
Disallow: /search

Sitemap: http://www.YOURBLOGNAME.blogspot.com/feeds/posts/default?orderby=updated

in our case look like this.

User-agent: Mediapartners-Google
Disallow:

User-agent: *
Disallow: /search

Sitemap: http://www.bl0gger-tricks.sblogspot.com/feeds/posts/default?orderby=updated

Above as i have highlighted in Olive is your site map address - Keep this you will need it later.

Sitemap 2

This is default 'atom 500' address :
  • atom.xml?redirect=false&start-index=1&max-results=500
Note:-The above code is for 1 to 500 posts and if you have more than 500 posts published on your blog then just copy the line below and paste it on that text box and add it. if you have not confirmed how many posts you have on your blog. Go and check your blogger dashboard to see how many posts have you written.
  • atom.xml?redirect=false&start-index=1&max-results=500
    atom.xml?redirect=false&start-index=501&max-results=500
You have now successfully generated the sitemaps.
1. Now Time to add Sitemaps to google. Go To Webmasters Tool and sign in with your Google account.
You will see list of all blogs that you created at blogger. Like Screenshot below click on your blog address.
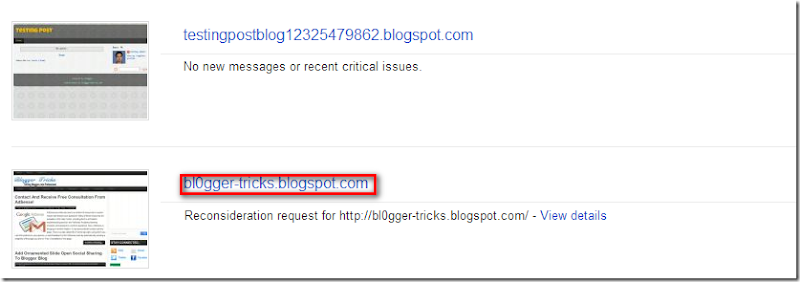
Click on Blog Link 2. Next click on Optimization. like screenshot below.
Click on Optimization
3. Next click on Sitemaps and add/text sitemap
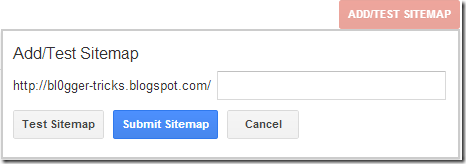
Add 4. In the blank form paste your first sitemap and then click "Submit Sitemap". Repeat this step for remaining sitemaps until you have finished submitting all the sitemaps that you generated.
Now Google will take only three days to crawl and index every single page of your blog.
and after 1-3 days your indexed URLS look like this. Click on image for large view.
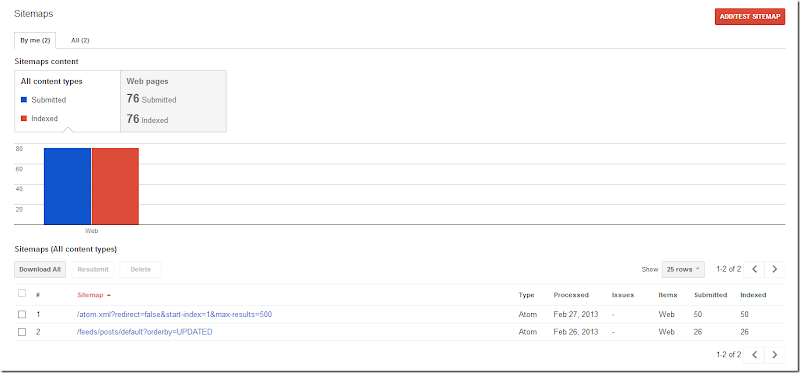
View of sitemap You have successfully submitted your sitemap to Google and if you are still unable to submit your sitemap then leave a comment below and let me know that why your sitemap is not submitting. I'll try my best to help you. Happy Blogging  thanks for reading our post. Keep up to date with new features and opportunities by subscribing to this blog via email Notification, adding our Google+ page to your circles or like us our page on facebook. Thanks for reading our posts.
Read Article →

3 comments

LinkWithin Related Posts widget is a lightweight plugin for WordPress and Blogger blogs.It can display up to 5 related posts.If you don't care about analytics and design of the related content widget, go for LinkWithin widget.For the purpose of engaged your visitor in you blogger blog this will be one of the best way by adding Related Post Widget to your blogger blog. Related Posts widget with thumbnail is for displaying some other related Articles to your readers at the end of each post. This widget will surely engage your reader in your blog and it will result in increased page views. After installation Tutorial, Today in this post I will share that how you can customize this widget. Before proceeding Customize the widget, Install Linkwithin Related Post Widget. The Customized Skin Also Available on MBT Blog. I have just Customized Version of this skin.


Updata:- 17-3-2013 New Color Scheme added..

1. First Add the widget to your blog

Apply this skin you will first need to install the linkWithin widget to your blog. The tutorial below will help you to add this plugin to your BlogSpot blogs.


2. Apply CSS3 Black and Gray Skin

Note:- Always Remember Before Editing Your Template Make a Template Backup (how to make a template backup)
1. Go to your blogger dashboard>> Template>> Proceed >> find the following code by pressing CTRL+F (how to find code using search bar)
]]></b:skin>

2. and paste the Following code above/before “]]></b:skin>”

/*---Related Posts---*/ 
#linkwithin_logolink_0 { 
display:none!important; 
}
#lws_0 {
clear: both!important;       
margin: 0 0 10px 0!important;    
}

.linkwithin_outer { 
margin: 1px 0px !important; 
background-color: #111;
background-image: -moz-linear-gradient(#444, #111);
background-image: -webkit-gradient(linear, left top, left bottom, from(#444), to(#111));
background-image: -webkit-linear-gradient(#444, #111);
background-image: -o-linear-gradient(#444, #111);
background-image: -ms-linear-gradient(#444, #111);
background-image: linear-gradient(#444, #111); 
height: 275px;
width:690px!important; 
padding: 0px !important; 
box-shadow: 0px 4px 4px -4px rgba(0, 0, 0, 0.7) !important; 
border-radius: 5px 5px 5px 5px; 
    }
 
.linkwithin_inner { 
width:690px!important; 
}
 
.linkwithin_text { 
margin: 0px !important; 
padding: 10px !important; 
font-size: 1.2em; 
color: rgb(255, 255, 255); 
font-weight: normal; 
line-height: 1.35em; 
text-transform: capitalize; 
background-color: rgb(18, 18, 18); 
border-bottom: 1px solid rgb(0, 0, 0); 
border-top-right-radius: 5px; 
border-top-left-radius: 5px; 
background-color: #111;
background-image: -moz-linear-gradient(#444, #111);
background-image: -webkit-gradient(linear, left top, left bottom, from(#444), to(#111));
background-image: -webkit-linear-gradient(#444, #111);
background-image: -o-linear-gradient(#444, #111);
background-image: -ms-linear-gradient(#444, #111);
background-image: linear-gradient(#444, #111); 
}
.linkwithin_posts a { 
font-size: 14px!important;
border-right:0px!important; 
margin: 10px 0px 10px 10px !important; 
}

.linkwithin_posts a:hover { 
border-right:0px!important; 
margin: 10px 0px 10px 10px !important; 
background:none!important; 
}
#linkwithin_logo_0 {display:none;}
.linkwithin_img_0 { 
border: 1px solid #666 !important; 
padding: 1px !important; 
width: 100px !important; 
height: 90px !important; 
margin-right: 15px !important; 
overflow: hidden; 
background:#444!important; 
}
.linkwithin_img_0:hover { 
opacity:0.8; 
} 
.linkwithin_img_0 div { 
width: 100px !important; 
 height: 90px !important; 
}
.linkwithin_title { 
color: rgb(255, 255, 255) !important; 
font-size: 1em !important; 
display: block; 
padding: 0px 10px 0px 0px !important; 
font-weight: 400 !important; 
line-height: 1.45em !important; 
margin-top: 10px !important; 
text-decoration:none!important; 
width:120px!important; 
}

if you want to use Skyblue Skin Use the Below Code . (Steps are same)

Skyblue 

/*---Related Posts---*/ 
#linkwithin_logolink_0 { 
display:none!important; 
}

#lws_0 {
clear: both!important;       margin: 0 0 10px 0!important;    } 

.linkwithin_outer { 
margin: 1px 0px !important; 
background-color: #319AE4;
background-image: -moz-linear-gradient(#5DBFEF, #319AE4);
background-image: -webkit-gradient(linear, left top, left bottom, from(#5DBFEF), to(#319AE4));
background-image: -webkit-linear-gradient(#5DBFEF, #319AE4);
background-image: -o-linear-gradient(#5DBFEF, #319AE4);
background-image: -ms-linear-gradient(#5DBFEF, #319AE4);
background-image: linear-gradient(#5DBFEF, #319AE4);
height: 275px;
width:690px!important; 
padding: 0px !important; 
box-shadow: 0px 4px 4px -4px rgba(0, 0, 0, 0.7) !important; 
border-radius: 5px 5px 5px 5px;     }

.linkwithin_inner { 
width:690px!important; 

}

.linkwithin_text { 
margin: 0px !important; 
padding: 10px !important; 
font-size: 1.2em; 
color: rgb(255, 255, 255); 
font-weight: normal; 
line-height: 1.35em; 
text-transform: capitalize; 
background-color: rgb(18, 18, 18); 
border-bottom: 1px solid rgb(0, 0, 0); 
border-top-right-radius: 5px; 
border-top-left-radius: 5px; 
background-color: #319AE4;
background-image: -moz-linear-gradient(#5DBFEF, #319AE4);
background-image: -webkit-gradient(linear, left top, left bottom, from(#5DBFEF), to(#319AE4));
background-image: -webkit-linear-gradient(#5DBFEF, #319AE4);
background-image: -o-linear-gradient(#5DBFEF, #319AE4);
background-image: -ms-linear-gradient(#5DBFEF, #319AE4);
background-image: linear-gradient(#5DBFEF, #319AE4);

}

.linkwithin_posts a { 
font-size: 14px!important;
border-right:0px!important; 
margin: 10px 0px 10px 10px !important; 
} 

.linkwithin_posts a:hover { 
border-right:0px!important; 
margin: 10px 0px 10px 10px !important; 
background:none!important; 
}
#linkwithin_logo_0 {display:none;}

.linkwithin_img_0 { 
border: 1px solid #666 !important; 
padding: 1px !important; 
width: 100px !important; 
height: 90px !important; 
margin-right: 15px !important; 
overflow: hidden; 
background:#444!important; 
}

.linkwithin_img_0:hover { 
opacity:0.8; 
} 
.linkwithin_img_0 div { 
width: 100px !important; 
height: 90px !important; 
}
.linkwithin_title { 
color: rgb(255, 255, 255) !important; 
font-size: 1em !important; 
display: block; 
padding: 0px 10px 0px 0px !important; 
font-weight: 400 !important; 
line-height: 1.45em !important; 
margin-top: 10px !important; 
text-decoration:none!important; 
width:120px!important; 
}

3. Click on save & you're Done!!! View your Blog & see Related Post Gadget New look.


Note:- The widget will display up to 5 thumbnails. If you wish to show 4 or 3 thumbnails  then simply increase the width size by editing  “linkwithin_inner Width & linkwithin_outer width”. if you want to show 5 stories your blog content width must be 720 Px.  Also set the number of stories to 5 on linkWithin homepage as mentioned in the tutorial where you learn how to install the widget on your blog. In my next tutorial i going to share with your another Beautiful Skin for Linkwithin Gadgets.


Keep up to date with new features and opportunities by subscribing to this blog via email Notification, adding our Google+ page to your circles or like us our page on facebook. Thanks for reading our posts.

Read Article →

1 comments
how to submit sitemap to google Creating a sitemap helps search engines better crawl and categorize your site. You can easily create and verify a sitemap for any of your publicly viewable Google Sites through Google Webmaster Tools.
A Sitemap is a listing of your site's pages that you can submit to Google and other search engines. This list can help search bots understand your site structure and may make crawls of your site by search bots more efficient. There is a number of ways to generate a sitemap for blogs and websites, here on blogger generating a sitemap and submitting it to Google can be done in 5 minutes and can be achieved by even the least experienced Blogger. Google will check the sitemap and begin indexing your site as soon as it's determined the sitemap has no errors. There are several steps that you need to follow in order to verify your website with Google. The first step will be setting up a free account with Google Webmaster Tools. Then you can add the meta verification tag, and submit your sitemap within your Google Webmaster Tools account. The following Screenshots will walk you through the process of placing the verification code. See screenshots below for further instructions.

In First Step You will need to verify your website in webmaster tools.

1. Sign in to Google Webmaster Tools  using the same account information you use to sign in to Gmail or other Google Product.
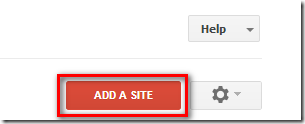
2. Click "Add a site.
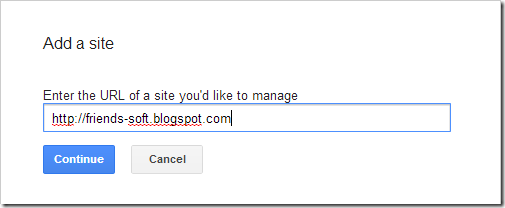
add a site 3. Enter the base URL of your Google Site in the box that pops up, then click "Continue."
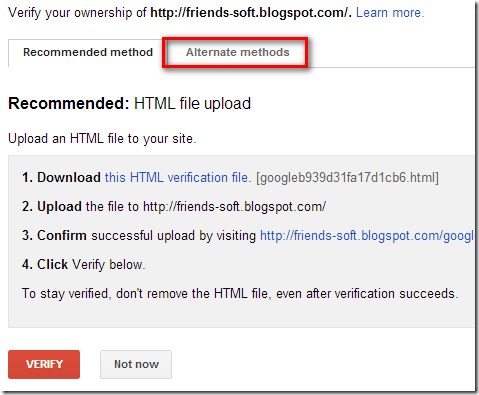
Click on Continue4. On the following page, select the radio button next to Add a meta tag to your site's home page.
Altnernative methods 5. Click on Alternate Methods like screenshot above.
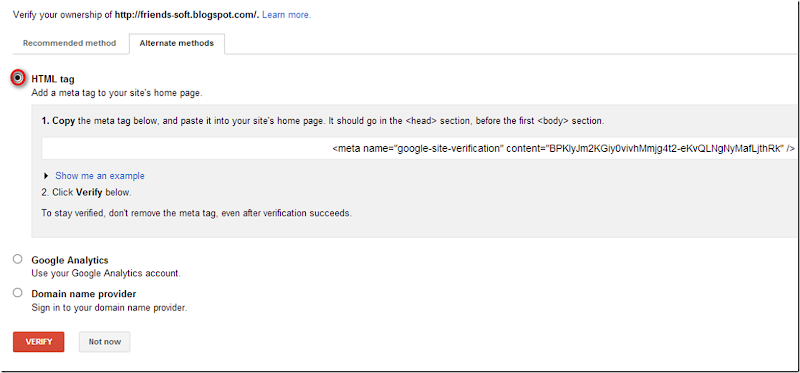
6. Click on HTML TAG circle like screen shoot below you will see HTML META TAG For verification your website or blog.
Check the HTML Tag Circle 
7. Copy the meta tag (for example, <meta name="google-site-verification" content="z5mJLjVGtEe5qzCefW1pamxI7H46u19n4XnxEzgl1AU" />) from the Instructions box.
8. In a new browser window or tab, navigate to the Google Site you wish to verify. (You will need to go back to the Webmaster Tools page, so do not close it.)
9. Paste Meta Tag after opening “<head>” Section.
2009-12-09_0852
Click "Save changes."
Go back to the Webmaster Tools page where you copied the meta tag.
Click "Verify." and you're done!!!!

Submitting your sitemap


1. Go To Your Webmaster Tools Dashboard>> Optimization >>

2. Click ADD/TEST SITEMAP Button

3. and paste your sitemap in input blank field.. 

Check out The Free Sitemap Generator Tools or PHP Sitemap Generator.
Now that Google knows where your site is and what's on it, it will be better able to index the pages (include them in search results). It will still take some time for your site to show up, but be sure and log in to your Webmaster Tools account regularly to see what you can do to improve your site's rankings.

Read Article →

3 comments
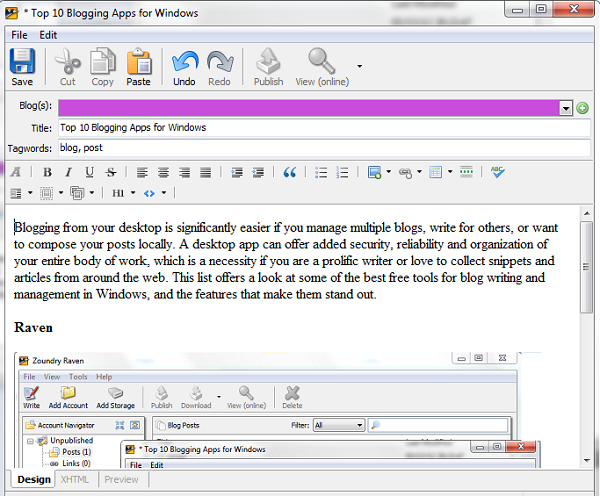
As an offline weblog client, BlogDesk lets you comfortably write and effortlessly publish new entries to your blog.
No need to use those annoying HTML Tags in the WYSIWYG editor. Images can be directly inserted and are automatically uploaded. Even publishing simultaneously to multiple blogs is a matter of a click.
Blogging from your desktop is significantly easier if you manage multiple blogs, write for others, or want to compose your posts locally. A desktop app can offer added security, reliability and organization of your entire body of work, which is a necessity if you are a prolific writer or love to collect snippets and articles from around the web. This list offers a look at some of the best free tools for blog writing and management in Windows based on usability and features.

Windows Live Editor

Click on headings for download & view more detail about Apps. Keep up to date with new features and opportunities by subscribing to this blog via email Notification, adding our Google+ page to your circles or like us our page on facebook. Thanks for reading our posts.
Read Article →

1 comments
Today i am going to show you how to add Google Toolbar in Internet Explorer. For Want to know your Google PageRank?  Well, there is only one way to know. You must have a Google Toolbar installed in your browser.
Why is your page rank important? 
The simple fact is that if you want your website to be a successful part of your business, then it needs to be found on Internet search engines. Google, by far and away, is the absolute, final, most important search engine on the planet.


Download the Google Tool bar for your own search needs.

Take the power of Google with you anywhere on the web.

• Search the web with Google from any site
• Eliminate pop-up ads
• Fill in forms with one click
• Highlight search terms on a page
• Updates automatically - no need to install software upgrades.

2. Click on Download Google Toolbar Like Screen Shoot Below.

3. Click on accept & install like screen shoot blow.
4. and your done.. After Installation Process Restart the internet browser and see your Toolbar below Address bar... Like Screen Shoot Below.
 Note:- if you can't see page rank button on toolbar click on more to add button in toolbar.. thanks for reading our post... 
Read Article →

2 comments
AdSense provides access to a number of resources to resolve issues and answer your questions. Many of these resources are available in the Help Center, including the Fix a Problem troubleshooting section, the AdSense Academy learning modules, and answers to common questions. Now, AdSense is bringing in another feature. A new personalized contact options page. There is a tab called HELP at the top-right, using which you can find solutions to your queries, or send feedback to the AdSense team by automatically sending a snapshot of the page you are on.

Free Consultations

This page serves as a single source for many commonly used troubleshooters that can help you resolve your issues in minutes. In some cases, these troubleshooters lead to issue-specific contact forms that generate emails to Adsense team. Google AdSense has developed automated tools, closely monitored by AdSense support specialists, to help fix issues you’ve identified and process these incoming emails, making it possible for us to typically answer your questions in only a few hours.
The new contact options page, troubleshooters, and specialized contact forms are available to all publishers with an approved AdSense account.

For those publishers generally earning more than $25 per week, AdSense Team  now offering consultations with members of AdSense Team via email in 33 languages. AdSense Team are happy helping you manage your AdSense account or discussing strategies to grow your business. If your account qualifies, you’ll see an alert notifying you on the contact options page. AdSense Team aim to reply to all consults within two business days, though turnaround may be longer during certain holiday periods. See Original Post at Inside AdSense Blog.

Are you excited about this new feature. AdSense is working Very Hard to help out publishers, which will Surley help Google in turn. Whatever the reasons though, publishers don't have any complains to make regarding this, because it'll help themselves. Keep up to date with new features and opportunities by subscribing to this blog via email Notification, adding our Google+ page to your circles.
Read Article →