Menu Close Menu

47 comments

facebook-popup-likebox This is my first tutorial on popup widget using Jquery  For The Blog And My Blogging Carrier Too.. First Of All Let Me say Thank to jacklmoore for provding A juqery light box. The popup Like box is not designed for make you blog look like professionals, The widget designed for get more Facebook like. This box has also a close botton at the top right corner. Visitor can close this widget by clicking on close button. Popup box widgets really annoy your visitors when they appear again and again, but they help you in developing your blog well when you use them properly. Facebook is a major source of traffic which can send your blog a good traffic flow when you have enough fans on your Facebook page. To expand your Facebook network and to increase your Facebook page's fans, I have brought a very stylish Onetime Facebook Like Popup Widget for your blogger blog which will appear onetime only and thus it will increase your Facebook fans dramatically without annoying your visitor. Facebook popup widget save a cookie in your visitor’s browser. when reader visit your blog first time Facebook like box is appear to your reader and when visitor navigate to another page or visit back later like box never appear again if readers doesn’t there browser cookies.


Live Preview


Add It To Blogger

You can Install This Widget Easily in your Blog By Following These Simple Steps....
Before you edit any template it's better to keep a Backup..So First Backup your Template.


1. Go to your Blogger Dashboard>>Template>>Edit Html

2. Find following code in your template.


</head>

3. and paste the following code before/above </head>

<script src='https://ajax.googleapis.com/ajax/libs/jquery/1.6.1/jquery.min.js'></script><script src='http://yourjavascript.com/69231961363/jquery-colorbox-min.js' type='text/javascript'/>
<script type='text/javascript'>
jQuery(document).ready(function(){
if (document.cookie.indexOf(&#39;visited=true&#39;) == -1) {
var setDays = 1000*60*60*24*7;
var expires = new Date((new Date()).valueOf() + setDays);
document.cookie = &quot;visited=true;expires=&quot; + expires.toUTCString();
$.colorbox({width:&quot;400px&quot;, height:&quot;430px&quot;, inline:true, href:&quot;#facebook-popup&quot;});
}});</script>


  • *7 Setting this value will effect cookie refreshment. I have set the likebox to appear once to the visitor and likebox will appear again after 1 week. If you want to display likebox to your visitors after a 1 day then set 7 to 1. if you set the value to 1 then it can annoying your regular readers.

4. Now Search for </b:skin>.  Click the black arrow to expand the code.


Blogger Compressed Stylesheet

5.  and paste following css code before above </b:skin>

/* Colorbox Core Style: The following CSS is consistent between example themes and should not be altered. */ #colorbox, #cboxOverlay, #cboxWrapper { position: absolute; top: 0; left: 0; z-index: 9999; overflow: hidden; } #cboxOverlay { position: fixed; width: 100%; height: 100%; } #cboxMiddleLeft, #cboxBottomLeft { clear: left; } #cboxContent { position: relative; } #cboxLoadedContent { overflow: auto; -webkit-overflow-scrolling: touch; } #cboxTitle { margin: 0; } #cboxLoadingOverlay, #cboxLoadingGraphic { position: absolute; top: 0; left: 0; width: 100%; height: 100%; } #cboxPrevious, #cboxNext, #cboxClose, #cboxSlideshow { cursor: pointer; } .cboxPhoto { float: left; margin: auto; border: 0; display: block; max-width: none; -ms-interpolation-mode: bicubic; } .cboxIframe { width: 100%; height: 100%; display: block; border: 0; } #colorbox, #cboxContent, #cboxLoadedContent { box-sizing: content-box; -moz-box-sizing: content-box; -webkit-box-sizing: content-box; } /* User Style: Change the following styles to modify the appearance of Colorbox. They are ordered and tabbed in a way that represents the nesting of the generated HTML. */ #cboxOverlay { background: #000; } #colorbox { outline: 0; } #cboxContent { margin-top: 20px; background: #000; } .cboxIframe { background: #fff; } #cboxError { padding: 50px; border: 1px solid #ccc; } #cboxLoadedContent { border: 5px solid #123D60; background: #fff; box-shadow: 3px 3px 3px #fff; } #cboxTitle { position: absolute; top: -20px; left: 0; color: #ccc; } #cboxCurrent { position: absolute; top: -20px; right: 0px; color: #ccc; } #cboxLoadingGraphic { background: url(http://2.bp.blogspot.com/-jcn46y_t6D0/Uc8cG9q6ExI/AAAAAAAAC1k/K63u_2VkemM/s32/loading.gif) no-repeat center center; } /* these elements are buttons, and may need to have additional styles reset to avoid unwanted base styles */ #cboxPrevious, #cboxNext, #cboxSlideshow, #cboxClose { border: 0; padding: 0; margin: 0; overflow: visible; width: auto; background: none; } /* avoid outlines on :active (mouseclick), but preserve outlines on :focus (tabbed navigating) */ #cboxPrevious:active, #cboxNext:active, #cboxSlideshow:active, #cboxClose:active { outline: none; } #cboxSlideshow { position: absolute; top: -20px; right: 90px; color: #fff; } #cboxPrevious { position: absolute; top: 50%; left: 5px; margin-top: -32px; background: url(https://sites.google.com/site/techprevue/home/controls.png) no-repeat top left; width: 28px; height: 65px; text-indent: -9999px; } #cboxPrevious:hover { background-position: bottom left; } #cboxNext { position: absolute; top: 50%; right: 5px; margin-top: -32px; background: url(https://sites.google.com/site/techprevue/home/controls.png) no-repeat top right; width: 28px; height: 65px; text-indent: -9999px; } #cboxNext:hover { background-position: bottom right; } #cboxClose { position: absolute; top: 5px; right: 5px; display: block; background: url(http://4.bp.blogspot.com/-wQsw3MW4DK4/Uc7_hhV5UzI/AAAAAAAAC1U/Uskeu5jhHbo/s130/controls.png) no-repeat top center; width: 38px; height: 19px; text-indent: -9999px; } #cboxClose:hover { background-position: bottom center; }


6. Save your template and you are done second last step! Visit your blog to see it working just perfectly. 

7. Now finally find following code.


</body>


8. and paste the following code before closing </body> tag.


<div style='display:none'>
<div id='facebook-popup' style='background:#fff;position:scroll;z-index:99999;'>
<div style='text-align:center;padding-top:15px'> <h3 style='font-family: &apos;Source Sans Pro&apos;, Sans Serif; Font-size: 18px; font-weight: 300px; '>Receive All Free Updates Via Facebook.</h3>
<iframe allowtransparency='true' frameborder='0' scrolling='no' src='//www.facebook.com/plugins/likebox.php?href=http%3A%2F%2Fwww.facebook.com%2Fmybloggerstricks&amp;width=342&amp;height=300&amp;show_faces=true&amp;colorscheme=light&amp;stream=false&amp;show_border=false&amp;header=false&amp;appId=' style='border:none; overflow:hidden; width:342px; height:300px;'/>
  </div>
  </div>
    </div>


  • Replace mybloggerstricks with your facebook fan page username.

save your template and you are all done. .!!

Visit your blogs and see it popping up just fine! Remember that the popup will show only once. To see it again you will first need to delete your browser cookie and then refresh the page to see it appearing again.

I just hope you would find this tutorial easy and yet exciting. Please let me know if you need any help. I just hope you can make your strong facebook fan growth. Wish you success and peace buddies. Stay updated by subscribing our email news feed or like our facebook page.

Read Article →

0 comments

type-font-collection-by-flatau I am big fan of typography myself and was surprised I haven’t done any good font collection yet! While doing research I was shocked how many high quality fonts are available for free & now with Sifr and similar tools you can use any font in your web-design, but if you are graphic designer you get even bigger enjoyment through such detailed and beautiful fonts. Balance between readability, elegance and use fonts with artistic approach to get best out of them, really that’s all you need to do. Finding the right typeface or font for a design can be a tricky process. So it’s good to have a nice selection of fonts at your disposal. With this article, we’re tying to help you out with that and give you some typographic enjoyment. Here are free fonts that are super clean and would be great to use in your next minimal style design. Image Credit:- Flatau


1. PT Sans By ParaType 


PT-Sans


2. PT Sans Caption By ParaType


PT-Sans-Caption


3. PT Sans Narrow By ParaType


PT-Sans-Narrow


4. Maven Pro by Joe Prince


Maven-Pro


5. Yanone Kaffeesatz by Yanone


Yanone-Kaffeesatz


6. Source Sans Pro By Paul D. Hunt


Source-Sans-pro


7. Ubuntu, 8 Stylesby Dalton Maag


Ubuntu

8. Ubuntu Condensed, 1 Style by Dalton Maag


Ubuntu-Condensed

9.Ubuntu Mono , 4 Styles By Dalton Maag


Ubuntu-mono

Note:- Above 9 Fonts we collect from google web fonts you search any font with the given name of the font and use in your online projects for free.


10. Sansation Type Face

• more than 500 glyphs
• advanced language support (including Cyrillic and Greek)
• ligatures
• oldstyle figures
• alternates (such as a usual lowercase k)
• real italics


sansation

11. Jalane Light


fonts_3

12. Quicksand, a free sans serif typeface


Quicksand

13. Multicolore Typeface


Multicolor


14. COM4t Nuvu Regular Typeface


com4t-nuvu-regular-free-high-quality-font


15.  Bellerose Typeface


bellerose-free-high-quality-font

Read Article →

1 comments

slow-pc When your PC starts its steady decline into sloth-like speeds, the first thing you’d love to do (besides beating it Office Space-style) is head straight to the mall for a fancy new machine. But the reality is there are easy changes you can make to speed up your computer. When I say to delete unwanted files, I do not mean you should go around your computer and delete any file you do not want. In this case, I’m talking about the files that you have created yourself, and are totally aware of what they are. For example if you created a Microsoft word document and you no longer need it, and never will, then I suggest you delete that file. This is the kind of junk that clogs up your computer. You have to ask yourself, “Do you really need it?” Files that you have created such as documents and image files can be safely deleted by going to the file on your computer, right clicking on its, and choosing delete from the menu. Keeping your computer or organized and junk free, is a great way to speed up your computer. The Method are by default provided by Microsoft in steps below we have nice tricky tutorial for speedup your windows. You might felt that fast booting in Windows 8 in the fresh installation. After you have installed many Windows 8 Apps and desktop softwares, the Windows 8 will boot time will be increased due to the many start up apps. We are using windows 8 pro. I am personally feel this issue with my windows and i have found solution on for this. We Always happy by sharing new useful tips and tricks with our reader. This tricks also working on windows 7.


So Lets Start The Tutorial

Disable Needless Services On StartUp

1. Go To Start Menu and type RUN or press Window key + R to open RUN window and in the input form field just type “msconfig” and hit enter.


Run-preview

2. In the windows that appear in your computer go to services tab and click on check box hide all Microsoft Services. Now you will see only third party software services. In our case we disable all services because when we need any service we will start service manually. So if would you like our tricks disable all third party services and press apply and then press ok.


Now we need to manage our startup Applications

1. Go windows task manager.

2. Right click on task bar then click on task manager.

3. click on more detail and go startup tab.

Task-manager-startup

4. and disable all unnecessary startup program. There you can see many startup programs you have installed like skype, yahoo, internet download manager Just click the program and disable that you don’t need to open that when Windows booting your system.


Disable Animations and Increase Performance

Windows 8 will animate when you Minimize,Maximize the window and closing the programs. These animations might reduce your system performance meaningfully.

1. Open RUN by going to start menu in your windows or press Windows key + R and type SystemPropertiesAdvanced  and hit enter.

System-Properties

2. Click on performance setting.


Performance-options

3. uncheck the animation effect box and fade or slide menu effect like screenshot above and press ok then press apply and again press ok.


Windows 8 Registry hack to Improve Speed

  1. End the tasks of the Applications or Apps which are not responding and taking much time to close by Windows Automatically .
  2. Decrease menus show delay time.

Windows Registry Editor Version 5.00 ;Made by RAJA CRN SpicyTricks.com [HKEY_CURRENT_USERControl PanelDesktop] "AutoEndTasks"="1" "HungAppTimeout"="1000" "MenuShowDelay"="8" "WaitToKillAppTimeout"="2000" "LowLevelHooksTimeout"="1000" [HKEY_CURRENT_USERControl PanelMouse] "MouseHoverTime"="8" [HKEY_LOCAL_MACHINESYSTEMCurrentControlSetControl] "WaitToKillServiceTimeout"="2000"

Just copy and paste this in Notepad and save this as registryspeed.reg. Then Open this file and Click yes when UAC dialog opens. After that again click yes to install this settings.


Stop Windows Indexing

Windows index service automatically monitor all your files and indexes all your files for easy searching. This background service significantly increase the load on your CPU and it might reduce your system performance. You can stop this service to get significant speed improvement in Windows PC.


windows 8 speed up stop windows search service How to Speed Up Windows 8 Booting Startup Time? Even Faster Performance


Step 1: Open RUN Window  by pressing windows key + R and type services.msc, and hit Enter. Then Find the Windows Search in the list, like right-click and select Properties. like screenshot above.


windows-8-speed-up-stop-windows-search-service-properties

Step 2: In the properties Window, set the start up type as Disabled.

This Trick originally share by SpicyTricks .com and i have modified version of this tricks.

Note:- Don’t be silly about this tricks and we are also using this tricks on our windows pc’s

We are always share tips which we are using for our blog or pc’s so never hesitate for using tips provided by My blogger Tricks. Thanks for reading our post.  Stay Tuned For more daily Updates by subscribing our social media pages or subscribe our by email news by filling the form available in sidebar section. God Bless you. Happy Blogging..!!

Image courtesy of iStockphoto, pick-uppath

Read Article →

3 comments

Lazy-load-Plugin-Preview There are also a couple of issues about server requests which makes our blog load lazily. Your site’s load time may hurt you visitors however, to decrease server requests in your Blogger blog we use some plugins or javascript. But before I began to show what plugins can help our blog to load faster.  When visitors first land on your blog there may be a number of images which need to be processed. This could take just a couple seconds or even 8-10 extra seconds for the request to finish. Waiting around for that long can get tiresome and you’ll lose people’s interest rather quickly. I have noticed the longest waiting times for blog posts often contain image galleries. These galleries may hold website design showcases, or any page/article with lots of images. If your readers have speedy Internet access this probably won’t become much of a burden. But is the risky burden even worthwhile? I feel these instances are great examples for when lazy loading could honestly benefit the readers. All images on the page will be held with placeholders until the user scrolls down further and hits each image in succession. There are often people who complain about this feature but I don’t see any problems. Personally I’ve never been annoyed by the effect and it actually seems like a wise method for reducing server loads. If you want see lazy loading effect more than 1 you need clear your browser cache and shift-reload to test again on demo page.


Live Preview


Add Load Lazy Plugin To Your Blogger Blog

Note:- Practically everyone has JavaScript enabled. However there are cases when you want to show the real images even if request come from client which does not support JavaScript. Google crawlers are one good candidate. Google crawlers do not execute JavaScript but also seem to ignore noscript content. To degrade gracefully when JavaScript is not enabled you can include the real image tag inside <noscript> block. More Documentation This is only for advance user.(Not A Beginner)


It improves your website’s performance by loading your website images lazily. This includes:
1. Post images
2. Post Thumbnails
3. Gravatar images and
4. iframe content
These images will loaded only when your visitors scroll closer to them.


Plugin has been tested with Safari 5.1, Safari 6, Chrome 20, Firefox 12 on OSX and Chrome 20, IE 8 and IE 9 on Windows and Safari 5.1 on iOS 5 both iPhone and iPad.


1. Go to your Blogger Dashboard>> Template>> Edit Html

2. and find the following code

</head>

3. paste following code before/above “</head>”


<script type='text/javascript'>
//<![CDATA[

/*
* Lazy Load - jQuery plugin for lazy loading images
*
* Copyright (c) 2007-2012 Mika Tuupola
*
* Licensed under the MIT license:
*   http://www.opensource.org/licenses/mit-license.php
*
* Project home:
*   http://www.appelsiini.net/projects/lazyload
*
* Version:  1.8.3
*
*/
(function($, window, document, undefined) {
    var $window = $(window);

    $.fn.lazyload = function(options) {
        var elements = this;
        var $container;
        var settings = {
            threshold       : 0,
            failure_limit   : 0,
            event           : "scroll",
            effect          : "show",
            container       : window,
            data_attribute  : "original",
            skip_invisible  : true,
            appear          : null,
            load            : null
        };

        function update() {
            var counter = 0;
            elements.each(function() {
                var $this = $(this);
                if (settings.skip_invisible && !$this.is(":visible")) {
                    return;
                }
                if ($.abovethetop(this, settings) ||
                    $.leftofbegin(this, settings)) {
                        /* Nothing. */
                } else if (!$.belowthefold(this, settings) &&
                    !$.rightoffold(this, settings)) {
                        $this.trigger("appear");
                        /* if we found an image we'll load, reset the counter */
                        counter = 0;
                } else {
                    if (++counter > settings.failure_limit) {
                        return false;
                    }
                }
            });

        }

        if(options) {
            /* Maintain BC for a couple of versions. */
            if (undefined !== options.failurelimit) {
                options.failure_limit = options.failurelimit;
                delete options.failurelimit;
            }
            if (undefined !== options.effectspeed) {
                options.effect_speed = options.effectspeed;
                delete options.effectspeed;
            }

            $.extend(settings, options);
        }

        /* Cache container as jQuery as object. */
        $container = (settings.container === undefined ||
                      settings.container === window) ? $window : $(settings.container);

        /* Fire one scroll event per scroll. Not one scroll event per image. */
        if (0 === settings.event.indexOf("scroll")) {
            $container.bind(settings.event, function(event) {
                return update();
            });
        }

        this.each(function() {
            var self = this;
            var $self = $(self);

            self.loaded = false;

            /* When appear is triggered load original image. */
            $self.one("appear", function() {
                if (!this.loaded) {
                    if (settings.appear) {
                        var elements_left = elements.length;
                        settings.appear.call(self, elements_left, settings);
                    }
                    $("<img />")
                        .bind("load", function() {
                            $self
                                .hide()
                                .attr("src", $self.data(settings.data_attribute))
                                [settings.effect](settings.effect_speed);
                            self.loaded = true;

                            /* Remove image from array so it is not looped next time. */
                            var temp = $.grep(elements, function(element) {
                                return !element.loaded;
                            });
                            elements = $(temp);

                            if (settings.load) {
                                var elements_left = elements.length;
                                settings.load.call(self, elements_left, settings);
                            }
                        })
                        .attr("src", $self.data(settings.data_attribute));
                }
            });

            /* When wanted event is triggered load original image */
            /* by triggering appear.                              */
            if (0 !== settings.event.indexOf("scroll")) {
                $self.bind(settings.event, function(event) {
                    if (!self.loaded) {
                        $self.trigger("appear");
                    }
                });
            }
        });

        /* Check if something appears when window is resized. */
        $window.bind("resize", function(event) {
            update();
        });
        /* With IOS5 force loading images when navigating with back button. */
        /* Non optimal workaround. */
        if ((/iphone|ipod|ipad.*os 5/gi).test(navigator.appVersion)) {
            $window.bind("pageshow", function(event) {
                if (event.originalEvent.persisted) {
                    elements.each(function() {
                        $(this).trigger("appear");
                    });
                }
            });
        }

        /* Force initial check if images should appear. */
        $(window).load(function() {
            update();
        });
        return this;
    };

    /* Convenience methods in jQuery namespace.           */
    /* Use as  $.belowthefold(element, {threshold : 100, container : window}) */

    $.belowthefold = function(element, settings) {
        var fold;
        if (settings.container === undefined || settings.container === window) {
            fold = $window.height() + $window.scrollTop();
        } else {
            fold = $(settings.container).offset().top + $(settings.container).height();
        }

        return fold <= $(element).offset().top - settings.threshold;
    };
    $.rightoffold = function(element, settings) {
        var fold;

        if (settings.container === undefined || settings.container === window) {
            fold = $window.width() + $window.scrollLeft();
        } else {
            fold = $(settings.container).offset().left + $(settings.container).width();
        }

        return fold <= $(element).offset().left - settings.threshold;
    };
    $.abovethetop = function(element, settings) {
        var fold;
        if (settings.container === undefined || settings.container === window) {
            fold = $window.scrollTop();
        } else {
            fold = $(settings.container).offset().top;
        }

        return fold >= $(element).offset().top + settings.threshold  + $(element).height();
    };
    $.leftofbegin = function(element, settings) {
        var fold;
        if (settings.container === undefined || settings.container === window) {
            fold = $window.scrollLeft();
        } else {
            fold = $(settings.container).offset().left;
        }

        return fold >= $(element).offset().left + settings.threshold + $(element).width();
    };

    $.inviewport = function(element, settings) {
         return !$.rightoffold(element, settings) && !$.leftofbegin(element, settings) &&
                !$.belowthefold(element, settings) && !$.abovethetop(element, settings);
     };

    /* Custom selectors for your convenience.   */
    /* Use as $("img:below-the-fold").something() or */
    /* $("img").filter(":below-the-fold").something() which is faster */

    $.extend($.expr[':'], {
        "below-the-fold" : function(a) { return $.belowthefold(a, {threshold : 0}); },
        "above-the-top"  : function(a) { return !$.belowthefold(a, {threshold : 0}); },
        "right-of-screen": function(a) { return $.rightoffold(a, {threshold : 0}); },
        "left-of-screen" : function(a) { return !$.rightoffold(a, {threshold : 0}); },
        "in-viewport"    : function(a) { return $.inviewport(a, {threshold : 0}); },
        /* Maintain BC for couple of versions. */
        "above-the-fold" : function(a) { return !$.belowthefold(a, {threshold : 0}); },
        "right-of-fold"  : function(a) { return $.rightoffold(a, {threshold : 0}); },
        "left-of-fold"   : function(a) { return !$.rightoffold(a, {threshold : 0}); }
    });

//]]>
</script>

<script charset='utf-8' type='text/javascript'>
$(function() {

   $(&quot;img&quot;).lazyload({placeholder : &quot;http://4.bp.blogspot.com/-wRaPvE0Jqrs/USIW4erewNI/AAAAAAAAFNk/TXDOtgYUGlc/s1600/grey.gif&quot;,threshold : 200});

});
</script>


Credit

A Plugin Created by Mika Tuupola. We are thank full to mika for this great effort. This plugin very useful for Image Gallery and also for your portfolio websites.


Attention

The number of internet users are turning into publishers at a fastest rate, therefore you must be careful when applying a tutorial to your blog and extra careful when the tutorial talks of Jquery and SEO. I am observing baseless SEO tips coming from new bloggers that causes more harm to blogs at long term then a short term relief. Almost every new blogger has started sharing his own ideas of SEO and writing codes. This is surely encouraging but on the other side incorrect knowledge has caused several blogs to be hit by Google penalties such as Panda and Penguin.


Need A More Help

Please let me know if you want any help here. I hope this technique would further help developers to create more interesting blogger templates and contribute further to the blogosphere community. I would love to hear your feedback on this. Please let us know of your precious views so that we could improve it further if needed. Thanks for reading our post. and don’t forget to subscribe our blog by using email notification, Facebook page or by following our twitter page. Thanks for reading our post.

Read Article →

35 comments
 New My blogger Tricks Template Blogger templates design and development of 2013! With the powerful of amazing templates, you can make your blog look exactly what you like. The design of any blog is one of the key factors to its success. For your browsing and inspirational delight, here is our awesome Blogger, Blog spot template for 2013. The have been selected because of their outstanding quality, attention to detail, super cool layout and feature-rich design. To keep the healthy tradition alive, we would love to gift all our loyal and million dollar worth readers a memorable gift. It took me around one week to Design, slice and then finally hard code a carefully structured Blogger template for the blogging community. Feel free to share your opinions and comments with us via comment section below. 


New Template 2013

Features

  • Nice and Elegant Template.
  • Fixed Width.
  • Adsense Optimized.
  • SEO Optimized.
  • 2 Navigation Menus.
  • 3 Column Footer Widgets.
  • Header banner Ads.
  • Infinite Scroll.
  • Custom Social Sharing Widget.
  • like This Article Widget.
  • Related Post Text Links.
  • Supports Default and Threaded Comments.
  • Cross Column Widget sections at top and bottom.
  • Default Jump Breaks for Post excerpts.
  • Breadcrumbs.

Download My Blogger Tricks Template

NOTE: Please do not re-share or Host this blogger template any where. !


Uploading Template on Blogger Blog

  1. Go to Blogger Dashboard > Locate your Blog if you have more then one blog.
  2. Click on More Options Drop Down and choose Template
  3. Click on the Backup/Restore button on Top Right Corner
  4. Click on Download Full Template button to backup your Old template for safety
  5. Click the Browse button and locate My Blogger Tricks blogger template
  6. Click on the Upload Button. And you are Done!

CUSTOMIZATION

Basic Steps:This basic steps you need to follow for each customization.
  1. On New Blogger Dashboard Go to Template > Edit HTML Button

Header Logo

We are added default logo you change it with your  own blog log.
by uploading in blogger Default (Header) widget. Go to layout and edit header widget. header widget showing in layout look like this.
logo widgetand upload you blog logo. logo size must be 350px X 80 px.

Customizing Top Navigation Menu

Search for the tag.

<!-- Start top menu  -->

To change links title simply replaced the text with your page titles and replace the hash sign (#) with respective links.

Customizing Bottom Navigation Menu

Search For the Tag
<!—Start Bottom Menu-->
To change links title simply replaced the text with your page titles and replace the hash sign (#) with respective links.

Infinite Scroll

If you wish to remove auto scroll Feature just remove infinite scroll script.
Search for this tag
<!--infinite scroll start-->
and remove jquery plus scroll script for body section and save it. done!!!..

CUSTOMIZING ADSENSE ADS

ADSENSE BELOW POST TITLE
  1. Adsense Ad Dimensions: 336px X 280px
  2. Search for the tag
  3. <!-- Adsense Below Post Title -->
  4. Put your Adsense Code just after the it.
  5. PS: Encode the Adsense code before pasting into the Template using the HTML Encoder
Adsense post for post bottom end
  1. Adsense Ad Dimensions: 336px X 280px
  2. Search for the tag <!-- Adsense Post Bottom -->
  3. After this Tag you will find the Default Adsense Code, Replace it with your Adsense Code.
  4. PS: Encode the Adsense code before pasting into the Template using the HTML Encoder

CUSTOMIZING THE DO YOU LIKE THIS ARTICLE BOX

CUSTOMIZE SOCIAL ICONS
  1. Search for <!--Like box Links --> code.
  2. After the code, you will find the social links, Change the URLs of Rss, Twitter, Facebook links respectively.
  3. and also In the email form change the bl0ggertricks feedburner Id in Two places.

Customizing Stay Connected Widget

  1. Go to Blogger Dashboard > Locate your Blog if you have more then one blog.
  2. Layout>> Add A Gadget. and paste the following code in gadget content area.
<div class="mbtstaycon">
    <ul>
        <li class="mbtrss"><a href="http://feeds.feedburner.com/bl0ggertricks">RSS</a></li>
        <li class="mbtmail"><a href="http://feedburner.google.com/fb/a/mailverify?uri=bl0ggertricks" >Email</a></li>
        <li class="mbttwitter"><a href="http://twitter.com/bl0ggertricks">Twitter</a></li>
        <li class="mbtfacebook"><a href="http://www.facebook.com/pages/Blogger-Tricks/448418608553191">Facebook</a></li>
                <li class="mbtgoogleplus"><a href="https://plus.google.com/103598710564060829080">Google +</a></li>
                <li class="mbtpinterest"><a href="pinterest.com/mybloggertrickx">Pinterest</a></li>
    </ul>
</div>
<div style="float: left; margin-right: 15px; margin-top: -4px;">
<a href="https://twitter.com/bl0ggertricks" class="twitter-follow-button" data-show-count="false" data-size="large" data-dnt="true">Follow @BloggerTricks</a><script>!function(d,s,id){var js,fjs=d.getElementsByTagName(s)[0];if(!d.getElementById(id)){js=d.createElement(s);js.id=id;js.src="//platform.twitter.com/widgets.js?a4185c";fjs.parentNode.insertBefore(js,fjs);}}(document,"script","twitter-wjs");</script>
</div>
<a href='http://feeds.feedburner.com/bl0ggertricks'><img alt='' height='26' src='http://feeds.feedburner.com/~fc/bl0ggertricks?bg=088A4B&amp;fg=444444&amp;anim=1' style='border:0' width='80' float='right' margin-right='5px'/></a>
change all links with your own social media and feed burner links.

For Further Help

You can also get further help from comments. please feel free to post your queries in the comment box below. Its Very Handy, Light weight and Professional Template.

Copyright

Bloggers and developers are hereby advised not to sell or redistribute the Template codes. You are also instructed not to remove My Blogger Tricks Credits from the Footer. Removing the Credit links will break the Template URL of your blog, leaving all your efforts in futile.
Premium version includes no watermarks. If you wish to buy the widget for Wordpress, Joomla or even Blogger Blogs, then you may kindly contact us via our our Contact Us Page.
Read Article →

3 comments

Protection from google panda effect When it comes to search engine optimization, things are changing all the time. Aside from the rollout of Google’s “Search, Plus Your World” in January 2012, the biggest update to the search company’s algorithm is Google Panda. Google Panda was first unleashed upon the Web a year ago in February 2011, and, in that year, there have been several updates to its algorithm. That is a Stringent Google new algorithm that looks for content ranches and link farms and completely stops indexing the publisher URLS. If your blog contains too many inappropriate content or Matching content or your post Amount is less than 300 words, you have too many category/labels on your blog or website that makes no Intellect then you can be the next target of Google panda update. So be aware from these errors and add no follow tag to your blog or website lables/category links. We will nofollow the labels that appear below your post titles and also the labels appearing in your sidebar category widget.


Add No Follow Tag to you blogger label links


1. Go to your blogger dashboard>> template>> edit html

2. and find the following code in your template coding.

<a expr:href='data:label.url' rel='tag'>

3. and replace above line with this code.

<a expr:href='data:label.url' rel='tag,nofollow'>

You are successfully added nofollow tag to your post body lable links. next steps is adding nofollow tag to your sidebar lable links

4. Now search for following code.

<a expr:dir='data:blog.languageDirection' expr:href='data:label.url'><data:label.name/></a>

5. Replace above code with this code.

<a expr:dir='data:blog.languageDirection' expr:href='data:label.url' rel='nofollow'><data:label.name/></a>

That’s it now you have done your little work but response is very big. You can confirm by viewing your template source in browser. I hope your blogs may grow raise more and may stay protected from Google panda effect. Keep up to date with new features and opportunities by subscribing to our blog via email Notification, adding our Google+ page to your circles or like us our page on facebook. Thanks for reading our posts.

Read Article →

30 comments

Free Premium Blogger TemplateFree Premium Blogger Template from http://Bl0gger-tricks.blogspot.com I used this blogger template for Bl0gger-tricks.blogspot.com.  So many of our readers requested the Bl0gger-tricks Old blogger template. and Now it is here to Download for Free!!!. It was actually created on December 13, 2012 and I modified and tweaked today. Before i coded the template with Hard-coded, That’s means i edit the template and add menu links. Now i added the Secondary and page-lists widgets to easy customization. It took me around one week to craft, slice and then finally hard code a carefully structured Blogger template for the blogging community. The name chosen this time is "Blogger Template". Below is Customization Detail For blogger Template.


Update:- 03-08-2013

Download Link is Updated

Read More Button Issue Resolved and also added 2 New Feature.

  • 3 Column Footer
  • Related Post Text Widget
  • Improved SEO Tags

Live Demo…!!!!

Click On image for Live Demo

Blogger Template

SEO

Data Variables for Titles and Post Pages already swapped
The clean HTML structure would make it fairly easy for search robots to crawl and index the pages easily without useless scripts block access.
Entire structure follows a hierarchal flow of Heading tags as per Search Robot requirements. H1 for Blog title, H2 for post & sidebar titles and H3 for sub-headings
Labels, Comments, Archive Links and Archive Pages are well optimized by setting robot entries
Commenting system is well shielded from spammers.
Load Time has been kept in mind as per Google Webmasters latest Page speed requirements
In short this template is a repository of all SEO features that a blogspot blog can contain!


Feature

In this template my main focus on Increasing blog loading time  so You can check live demo and check loading speed…

This Template is Absolutely Free!!


Download Now


How To Upload The Blogger Template

1. Go to Blogger Dashboard > Locate your Blog if you have more then one blog.
2. Click on More Options Drop Down and choose Template
3. Click on the Backup/Restore button on Top Right Corner
4. Click on Download Full Template button to backup your Old template for safety
5. Click the Browse button and locate way2blogging’s blogger template
Click on the Upload Button. And you are Done!

CUSTOMIZATION

Basic Steps:This basic steps you need to follow for each customization.

On New Blogger Dashboard Go to Template > Edit HTML Button.


Customize Menu Links

1. Search For These Line  <div class='Bt-nav'>

and you will code look like This.

<div class='Bt-nav'>     <div id='menu_wrap'>         <div id='menu'>           <ul>             <li>               <a class='current' href='http://bl0gger- tricks.blogspot.com/'> Home</a>
 
</li>             <li><a href='http://bl0gger- tricks.blogspot.com/search/label/Blogger'> Blogger</a></li>

<li><a href='http://bl0gger- tricks.blogspot.com/search/label/Adsense'> Adsense</a></li>
<li><a href='http://bl0gger-tricks.blogspot.com/search/label/Make%20Money %20Online'> Make Money</a></li>             <li><a href='http://bl0gger- tricks.blogspot.com/search/label/S.E.O'>SEO</a></li>

<li><a href='http://bl0gger-tricks.blogspot.com/search/label/Blogger %20Widget'>Widgets</a></li>             <li><a href='http://bl0gger- tricks.blogspot.com/search/label/Apps'>Application</a></li>             </ul>
</div>       </div>       <!-- End - Navigation Menu  -->       


<!--Start Secondary Menu --> <div id='secondary-Menu'>         <div style='float:left;'>           <ul id='secondary- nav'>             <li><a href='http://bl0gger-tricks.blogspot.com/p/guest- post.html'> Guest Post </a></li>             <li><a href='http://bl0gger-tricks.blogspot.com/p/blog- page.html'>Downloads</a></li>             <li><a href='#'>Templates </a></li> <li><a href='#'>FAQ</a></li>             <li><a href='https://plus.google.com/103598710564060829080'>About</a></li> <li><a href='http://bl0gger-tricks.blogspot.com/p/required- field.html'>Contact</a></li>             <li> <a href='#'>Advertise</a></li>             <li><a style='cursor:pointer;'>Tools &#187;</a> <ul> <li><a href='http://bl0gger- tricks.blogspot.com/p/html-editor.html'>HTML Editor</a></li>                 <li><a href='http://bl0gger- tricks.blogspot.com/2013/03/HTML-EnCoder-Desktop- Application.html'>Encode HTML Characters</a></li>                <li><a href='http://bl0gger- tricks.blogspot.com/p/free-google-page-rank- checker.html'>Page Rank Checker</a></li>                 <li><a href='http://bl0gger- tricks.blogspot.com/2012/11/two-color-code-generator- tools.html'> Color Code Generator</a></li>               </ul>             </li>           </ul>         </div>       </div>

Replace Title with your title and link with your blog links.

One Little Issue in This template

When you are writing a post you need to add  <!—more—> where you want to add Read More Button.. You can Also See Video For This Tip

you can get further help from Comments. Please leave your Comments and share this Template with your friends. Thanks.

NOTE: -Please do not re-share or Host this blogger template any where. !

Read Article →

53 comments

Tab Menu For Blogger

A navigation or menu bar is a bar made up of tabs. “Behind” each of those tabs is a link -to a post page, a static page, a label page, to another website etc. Making navigation tabs is not that difficult. They are basically links with some styling added for visual appeal. While links are arranged vertically, navigation tabs are usually arranged horizontally. In this tutorial we will install the bar just below the header, a typical place for navigation bar. The bar will be added as a gadget via Page Elements page. The advantage of using a gadget is that if you want to remove it later on, it can be done easily without editing the HTML. But in order to do that, the template must have an Add A Gadget link thingy or widget container as I would call it, at that particular location. The is no such element. What do we do then? We create it. In our next tutorial we will learn how create Element just below header.


Update:- 11 November 2013… Version 2.0 Available.


Live Preview


Add It To Blogger


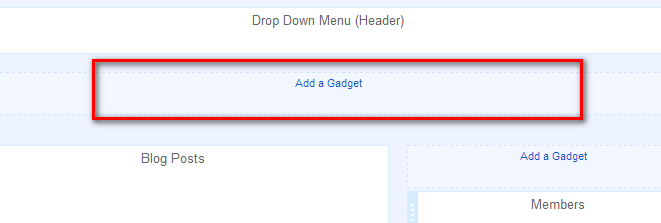
1. Go to your Blogger Dashboard>> Layout>> and click on add a gadget (Just Below Header Like Screen Shot.)

how to a  add Gadget

2. Click Add A Gadget link below the header.
3. Scroll down the Add A Gadget window and select HTML/JavaScript.
4. Leave the title box empty.
5. Copy and paste the HTML code below into the content box.

<style>

#tab_menu {
	background:url(http://3.bp.blogspot.com/-OycpSljNY-E/UbidzWvOk4I/AAAAAAAACYs/lGxPWmjfzlA/s1600/menu_bg.png) no-repeat;
	height:50px;
	width:960px;
	line-height:50px;
	list-style:none;
	margin-top:10px;
	font-size:14px;
	font-family:Verdana, Geneva, sans-serif;
	font-weight:bold;
	overflow:hidden;
}

#tab_menu li {
	float:left;
	border-right:1px solid #FFA722;
	border-left:1px solid #CC5200;
}

#tab_menu li:first-child {
	border-left:none;
}

#tab_menu li:last-child {
	border-right:none;
}

#tab_menu li a{
	text-decoration:none;
	float:left;
	display:block;
	height:50px;
	padding:0 20px;
	color:#FFF;
}

#tab_menu li a.current, #tab_menu li a:hover, #tab_menu li a.tool:hover {
	color:#622900;
	text-shadow:1px 1px 0px #E8964B;
}

#tab_menu li a.tool{
	color:#000;
	text-shadow:1px 1px 0px #E8964B;
}

</style>


<ul id='tab_menu'>
<li ><a href='#'>Home</a></li>
<li ><a href='#'>PRODUCT</a></li>
<li ><a href='#'>FAQS</a></li>
<li ><a href='#'>CONTACT US</a></li>
<li ><a href='#'>ABOUT US</a></li>
</ul>

6. Replace “#” with the URL of your destination page or blog.  

7. You can get the URL of a page by copying the content of your browser’s address/URL bar while you are on that page.  
8. To show all posts under a label (category), you need to link to the label’s page.

9. To change the width of the menu edit width: 960px.


Update:- 20-06-2013 Background Option Added


1.

menu_bg_1
http://3.bp.blogspot.com/-f3ORap0IbMI/UcQLTr-sN1I/AAAAAAAACjA/lLak8xIEoxA/s1600/menu_bg_1.png

2. menu_bg_2

http://3.bp.blogspot.com/-I5ddZuLgrJw/UcQLTjhTmAI/AAAAAAAACjI/Yb3yhgPRIBI/s1600/menu_bg_2.png

3. menu_bg_3

http://1.bp.blogspot.com/-_P9c5moKK7o/UcQLUc9rF1I/AAAAAAAACjU/anVA6KuWp9U/s1600/menu_bg_3.png

4. menu_bg_4

http://3.bp.blogspot.com/-OB85xAfJPfI/UcQLUnbbJGI/AAAAAAAACjg/yWWiaCSgjdk/s1600/menu_bg_4.png

5. menu_bg_5

http://3.bp.blogspot.com/-eKVpgd7fjkA/UcQLUgO_EAI/AAAAAAAACjY/NfsBYjPXyhQ/s1600/menu_bg_5.png

6. menu_bg_6

http://3.bp.blogspot.com/-4ccU3i0MrDs/UcQLVRHIlqI/AAAAAAAACjw/XnIWQ_dTVuc/s1600/menu_bg_6.png

7. menu_bg_7

http://3.bp.blogspot.com/-9i_l3hRT6Y0/UcQLVcvpW0I/AAAAAAAACjs/ZOW6CjQRff0/s1600/menu_bg_7.png

8. menu_bg_8

http://3.bp.blogspot.com/-QX3hor6qsBI/UcQLVm-rJbI/AAAAAAAACj0/rDVtHMvgfoY/s1600/menu_bg_8.png

9. menu_bg_9

http://2.bp.blogspot.com/-a2i-Vuheci4/UcQLWEpqL3I/AAAAAAAACkE/mdbH_irg_a8/s1600/menu_bg_9.png

10. menu_bg_10

http://4.bp.blogspot.com/-wLdR4j6FmPE/UcQLTjvxQ2I/AAAAAAAACjE/Ao5IPiehxtE/s1600/menu_bg_10.png

Just Replace highlighted background URL with any background which you want to add in menu.

background:url(http://3.bp.blogspot.com/-OycpSljNY-E/UbidzWvOk4I/AAAAAAAACYs/lGxPWmjfzlA/s1600/menu_bg.png) no-repeat;

For any further help please feel free to post your queries in the comment box below. Please do not hesitate to ask questions, we love responding! Its Very Handy, Light weight and Professional Tab Menu. Subscribe to our blog via email or RSS and Like our Facebook page to receive free future updates.

Enjoy!

Read Article →

4 comments
Infinite Scrolling For Blogger Infinite scroll has been called autopagerize, unpaginate, endless pages. But principally it is pre-fetching content from a Consequent page and adding it directly to the user’s current page. Infinite Scroll is a popular way to dynamically load fresh content into a site as a user scrolls down through it. The uninterrupted attention a user maintains when more content is provided automatically is at the core of the attraction of the infinite scrolling. The reader will not have to stop to think where to find the next button or which number of pages should come, following an improved attention. In psychosomatic terms, infinite scrolling seems to trigger automatic responses based on interest  and the alleviation of the expectation produced while waiting for new information, which causes a kind of excitement and willingness to continue scrolling to see what comes up. So i think we need to stop discussion and start tutorial. Here’s a quick walkthrough of how to do it. In the Live Preview I have the set home page to show 3 posts, scroll to the end of the posts you will see the link to "Load More Posts". If you continue scrolling  posts will load automatically.


Add it to blogger

1. Go to your blogger dashboard>>template>>edit html
2. Press CTRL+F and Find the following .
</body>
3. Copy the code below and paste it right before/above </body> tag in your template.
<script src='http://code.jquery.com/jquery-1.7.1.min.js' type='text/javascript'></script>
<script type="text/javascript" src="http://yourjavascript.com/40233106134/infinite-scroll.js"></script>
4. That’s it you're done! Save it and view your blog.

Credits

This Smart Feature script Written By  Manki's Weblog, Visit Manki’s Blog say thanks and if you want reshare this article Please give a link back to this page. Thank You in advance.

Having More Trouble

For any further help please feel free to post your queries in the comment box below. Peace and blessings buddies. Subscribe to our blog via email or RSS and Like our Facebook page to receive free future updates. Enjoy! Thanks for reading our post. Keep up to date with new features and opportunities by subscribing to our blog via email Notification, adding our Google+ page to your circles or like us our page on facebook. Thanks for reading our posts.
Read Article →

4 comments

3D Sitemap Symbol Getting traffic to your site starts with being listed in the search results shown on Bing. Bing Webmaster tool can help you with this stride.The first step to getting your site online and to get better rankings in bing and yahoo is to submit your sitemap to bingwebmastertools. Eventually the search engines will find your site but this will help expedite the process. Once you submit your sitemap, it could take several days for the search engines to index your page(s). Results may vary so don’t write this in stone. Factors such as other websites pointing to your site can affect this time as well.  After Submitting your website URL To bing. You can get Sketchy  information on how many sites were connecting  you and could also make a Calculation of the total number of internal links within your website or blog. But since now Yahoo has joined hands with Bing search engine by Microsoft, our job turn out to be even more easy, because submitting your blog at Bing will set it alive at two search engines, together  Bing and yahoo. Heretofore MSN did not Essential sitemap and you only needed to submit your link to them by pinging them but with the replacement of MSN search engine by latest BING, Microsoft is now Agreeably following Google's ways.


Submit your blog  or website url to bing and yahoo

Update: 01-04-2015

Google add automatically sitemap file in your root directory and we are update the instructions for submitting sitemap to bing and yahoo according to new update.


1. Sign in To Bing Webmaster Tools (Using Hotmail or live account)

2. Once you logged in, Goto>> Configure My Site

3. Click on Sitemap.

4. you will see option like screenshot below.

5. Delete Your old Rss feed sitemap, In case you have running with old rss sitemap if not skip this step.


Bing_sitemap_tool


5. Fill up the form with correct Sitemap Directory Link. In my case >>


http://www.myblogger-tricks.com/sitemap.xml


6. Before adding change myblogger-tricks.com” to your own blog name.


Please note before submitting ensure your sitemap directory is working well by opening your sitemap directory into your browser by opening sitemap.xml directory.


and then Paste the tested sitemap directory link into the input field and click on submit button.


7. Once you click on submit then page will be redirect on verification page, On verification page, You will be provided three standard methods. Choose the second option which is "Copy and paste a tag in your default webpageIt’s very Easy and recommended method.


8. So copy the meta tag and paste the copied tag after opening (Inside Your Blogger Template) <head> tag.


Step By Step Guide For Newbies


1. Go to your blogger Dashboard>>Template>>edit html and near the top you will found <head> tag just below it paste verification meta tag.


2. and finally click on save button (Orange Button at the top right corner).


3. Go back on bing webmaster tool and click on “verify” button. If you place the verification code correctly then your sitemap will be successfully added to the list.


Note:- Initially the status will be Pending. After Bing has fetched and processed the sitemap, Bing Webmaster tool will update the status and the other details such as how many URLs we discovered while highlighting any issues encountered. Processing submitted sitemaps takes time and can take from a few hours up to a few days. Normally it should take at most 3 days for Bing and Yahoo to start showing data for your newly submitted site but it can even take 5 days. We will try shot a video tutorial as soon as possible, so stay tuned for next update.


I hope the above instructions will help you a lot but if you need further help our comment is always open for Article Related issues. Happy Blogging..!! Smile

Read Article →